

You're in the middle of designing your dream home or remodeling a room to reflect your current aesthetic. After choosing the perfect tiles for your project, you need to set them into place.
Suddenly, you stumble upon the term "back buttering" while researching tile installation. But what does it really mean, and is it something you should care about?
As experts in porcelain tile in West Palm Beach, we’ve learned which steps are worth following and which ones are a waste of time when installing floors and walls.
In this blog, we’ll tell you what back buttering tile entails, why it matters, and how you can do it yourself and still achieve professional-quality results!
What Does Back Buttering Mean?
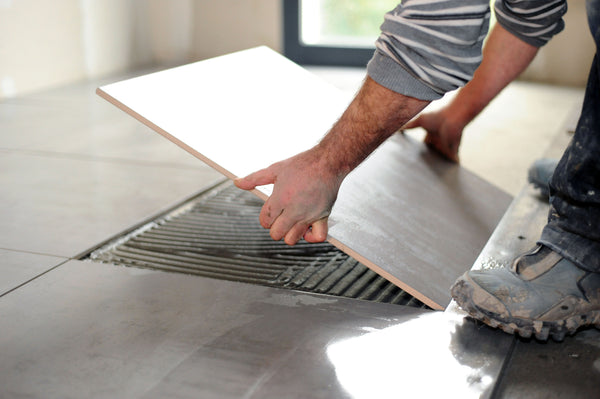
Back buttering might sound like a fancy term, but it's a straightforward process for a more successful tile installation. It refers to the process of applying a thin layer of mortar or adhesive to the back of each tile before setting it in place. You can either use a trowel or a flat side to get the job done.
Benefits of Back Buttering
Back buttering might seem like a hassle, especially if you're working on a large tile project. Here, we’ll explain why it’s worth the effort:
Creates Stronger Bond with Mortar
Back buttering enhances the bond between the tile and the substrate by ensuring full coverage of mortar or adhesive on both surfaces. When tiles are back buttered, there are no gaps or voids between the tile and the substrate, which improves the bond strength.
With this process, your tiles are less likely to loosen or pop off over time. This comes in handy for high-traffic areas, such as kitchens or bathrooms, and environments with temperature fluctuations.
Fills Voids on The Back of The Tile
Tiles can have imperfections on their backs, such as unevenness or small voids. Back buttering allows you to fill in these gaps and create a smooth surface for the tile to adhere to.
Once you get rid of air pockets and create full contact between the tile and the substrate, you reduce the risk of tile failure and make the floor or wall last for years after the installation.
Fills Inherent Tile Warpage
Some tiles, particularly larger format or natural stone ones, have inherent warpage or curvature. Back buttering gives you an opportunity to compensate for the irregularities by applying a thicker layer of mortar or adhesive to the back of the tile.
You can flatten out the tile and minimize any gaps between the tile and the substrate for a more even and visually appealing result.
Minimizes Tile Slippage and Lippage
Back buttering also prevents tiles from slipping or shifting during the installation process, which can lead to unevenness or lippage between adjacent tiles.
If each tile is securely bonded to the substrate, you maintain consistent spacing and alignment throughout your project.
Improves Water Resistance
Finally, the tight bond that back buttering creates make your new surfaces more water-resistant. With fewer gaps and voids, there are fewer opportunities for water to seep beneath the tiles and cause damage to the underlying structure.
This perk of back buttering is even more useful in wet areas such as bathrooms, showers, and kitchens, where moisture is always around.
Is Back Buttering Your Tiles Mandatory?
The question whether back buttering tiles is a requirement often comes up in the world of tile installation, and the answer is no, not really.
The American National Standards Institute (ANSI) states that the average contact area between the tile and the substrate should be at least 80%. However, in certain situations like exterior or shower installations, where there's a higher risk of water exposure, the contact area should be 95% or higher.
In other words, the mortar or adhesive used to set the tiles should cover at least 80% or 95% of the back surface of each tile, respectively.
While back buttering isn't mandatory, we highly recommend it if you want to increase your chances of a successful and long-lasting tile installation.
Which Tiles Need Back Buttering?
Porcelain Tiles
Porcelain tiles are strong, durable, and available in a wide range of designs. While they're known for being non-porous, they can still benefit from back buttering to prevent water seepage underneath their surface.
The high density that makes porcelain tiles so resistant can be their downfall during installation, as they don’t bond as easily as other tiles. Therefore, back buttering your porcelain tiles ensures they stick and don’t slip, especially if they're on the larger side or have uneven backs.
Natural Stone Tiles
Natural stone tiles, like marble, travertine, and slate, bring a touch of natural beauty to any space. However, they can be a bit trickier to work with because they come in different thicknesses and textures.
With back buttering, you can fill in any gaps or bumps in these tiles to create a smooth surface that sticks perfectly to the substrate.
Large Format Tiles
Large format tiles, which are the ones larger than 12x12 inches, have become very popular in modern design. While you can use them to create a sleek and modern look, they also present specific challenges during installation.
Large tiles tend to warp or cup when they’re being made, particularly during the firing phase. As a result, they’re uneven and difficult to work with.
Back buttering provides some extra support to keep your big tiles nice and flat, making installation easier for you or the professionals in charge of your project.
Exterior or Wet Areas
Tiles in outdoor areas or wet environments, like patios, pool decks, or showers, need a little extra TLC to withstand the elements, moisture, and changes in temperature.
Back buttering helps to protect against issues like tile delamination, cracking, or mold growth, as your tiles will adhere better to your walls and floors.
How to Back Butter Your Tiles During Installation
1. Gather Your Materials
Before you start back buttering your tiles, make sure you have everything you need. You should have the following:
- Your tiles
- Mortar or adhesive
- A trowel
- A bucket for mixing mortar
- A mixing paddle or drill attachment
2. Choose the Right Trowel Notch Size and Shape
Not every trowel will work to cover your tiles with mortar. According to experts at our porcelain tile store in West Palm Beach, you need a trowel with square or U-shaped notches for back buttering, as these create even ridges of mortar on the back of the tile.
The size of the notches will depend on the size and thickness of your tiles, but a good rule of thumb is to use a larger notch size for larger tiles for adequate coverage.
3. Prepare Your Mortar
Mix your mortar according to the manufacturer's instructions, and make sure you achieve a smooth and creamy consistency. Avoid mixing too much mortar at once, as it can start to dry out before you have a chance to use it all.
4. Apply Mortar to the Back of the Tile
Using the flat side of your trowel, scoop up a small amount of mortar and spread it evenly across the back of the tile. Be sure to cover the entire surface with a thin, even layer of mortar, leaving no gaps or voids.
5. Use a Directional Troweling Technique
Once you’ve applied the mortar to the back of the tile, use the notched side of your trowel to create ridges or grooves in the mortar. Hold the trowel at a 45-degree angle and comb the mortar in one direction across all the surface of the tile.
For more information on how to trowel mortar to set your tiles, please check out the video "Trowel and Error" from the National Tile Contractors Association.
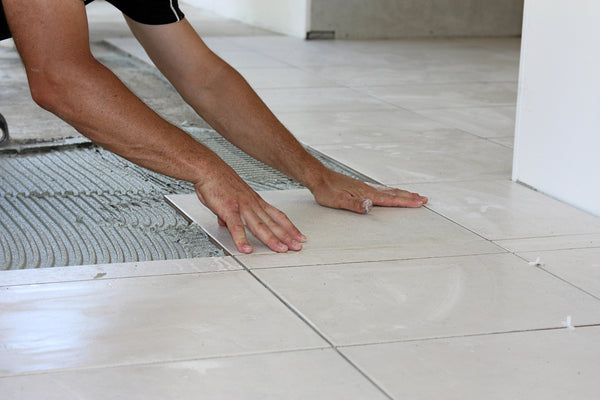
6. Set the Tile in Place
After back buttering the tile, press it into position on the substrate using a slight twisting motion to ensure full contact between the tile and the surface. Then, tap each one with a rubber mallet to ensure it is properly seated.
7. Repeat the Process
Continue back buttering and setting tiles in place, working in small sections at a time so the mortar you made doesn't dry out. Check the alignment of the tiles from time to time and make the necessary adjustments.
Other Tips to Keep in Mind During Tile Installation
- Prepare the surface: Before you start laying tiles, make sure the surface is clean, flat, and free of any debris or contaminants.
- Use Tile Spacers: Tile spacers are small plastic wedges that maintain consistent spacing between tiles. Using them will help you make uniform grout lines. Be sure to remove the spacers before grouting.
- Clean Up Excess Mortar: After setting each tile, use a damp sponge or cloth to clean up any excess mortar that may have squeezed out from the edges.
- Allow Proper Curing Time: Once all the tiles are set in place, allow the mortar to cure for the recommended amount of time before grouting. It usually takes from 24 to 48 hours, depending on the type of mortar and the environmental conditions.
- Use the Right Grout: Sanded grout is often used for wider grout lines, while unsanded grout is better suited for narrower grout lines or polished tiles.
- Seal the Grout: Grout sealer protects your tiles from stains and moisture and prolongs the life of your surfaces.
Get Started on Your Project with Quality Porcelain Tile in West Palm Beach!
Ready to tackle your tile project? Contact D&B Tile for top-quality products and expert advice on porcelain tile installation in West Palm Beach.
Whether you're a seasoned DIY-er or need professional assistance, we're here to help. Reach out today!